Short answer: a name badge template puts the first name biggest, then the last name, company and role, with an event logo, an attendee type and a QR code for check-in. The standard conference badge is 4 × 3 in, printed six to a letter sheet and worn in a clear holder on a lanyard; smaller events use 3.5 × 2.25 in inserts or 2⅓ × 3⅜ in stickers, and staff IDs use the CR80 card size (85.6 × 54 mm).
Below: what makes a badge readable across a room, which size fits which holder, and how to print one badge per attendee from your registration spreadsheet, each with its own QR code.
What goes on a name badge: the checklist
| Field | Why it's there | Example |
|---|---|---|
| First name | What people read first, so it's the biggest | Amara |
| Last name | Smaller, under the first name | Okafor |
| Company or organization | The second thing people ask about | Northfield Labs |
| Role or title (optional) | Helps people find who they came to meet | Head of Data |
| Attendee type | A color band or label: Speaker, Staff, Sponsor, Attendee | SPEAKER |
| Event name and logo | Small, at the top or bottom | Data Summit 2026 |
| QR code | Check-in, session scanning or lead capture | Encodes an attendee ID |
| Pronouns (optional) | Only if the attendee chose to add them | she/her |
The QR code holds whatever your check-in or lead app scans, usually an attendee ID or a link. If your registration tool gives each person a code, use that exact value.
How to design a name tag people can read
- First name as large as it fits. People read badges from a few steps away, at an angle, while someone is talking. Last name and company can be half the size.
- Test with your longest name. Pull the longest first name and company from your list before you approve the design. A long name that wraps or shrinks is the most common badge failure.
- One color per attendee type. A band along the bottom in a different color for speakers, staff and sponsors lets volunteers spot who to send where.
- Plain, heavy type. Script and thin fonts are hard to read behind a plastic holder.
- Print both sides. Badges on a lanyard flip around. Repeat the name on the back, or use the back for the schedule and Wi-Fi details.
- Leave room at the top of an insert, where the holder's slot or clip sits.
Standard name badge sizes
Sizes from label makers' name badge listings (checked November 2026), the ISO/IEC 7810 card standard, and holder makers' size charts:
| Size | Millimeters | Format | Per letter sheet | Typical use |
|---|---|---|---|---|
| 4 × 3 in | 102 × 76 mm | Insert for a clear holder | 6 | Conferences, trade shows, all-day events |
| 3 × 4 in | 76 × 102 mm | The same insert, portrait | 6 | Portrait holders, badges with a photo |
| 3.5 × 2.25 in | 89 × 57 mm | Smaller insert | 8 | Meetings, workshops, smaller holders |
| 3⅜ × 2⅓ in | 86 × 59 mm | Adhesive sticker | 8 | Short meetups, evening events |
| CR80 (3.37 × 2.125 in) | 85.6 × 54 mm | PVC card, credit card size | n/a | Staff and student ID, access cards |
| 4 × 6 in | 102 × 152 mm | Large insert for a big holder | n/a | Badges with an agenda or sponsor panel |
Label makers list this insert as 3 × 4 inches; printed landscape it's the 4 × 3 badge most conferences use. Check which way your holders open before you design.
CR80: the ID card size
CR80 is the industry name for the ISO/IEC 7810 ID-1 format: 85.60 × 53.98 mm, which the standard gives as 3.370 × 2.125 inches. Badge holder makers often round it to 3.375 in. It's the size of a credit card or driving license, printed on PVC with a card printer. Use it for staff IDs and access cards that last a year, not for a two-day conference.
Sizes in pixels at 300 dpi
| Size | Pixels at 300 dpi |
|---|---|
| 4 × 3 in | 1200 × 900 |
| 3.5 × 2.25 in | 1050 × 675 |
| 3⅜ × 2⅓ in | 1013 × 700 |
| CR80 (85.6 × 54 mm) | 1011 × 638 |
| 4 × 6 in | 1200 × 1800 |
Lanyard and badge holder sizes
The badge and the holder have to match, and the holder and the lanyard have to match.
- Holders come in CR80 (for ID cards), 3 × 4 or 4 × 3 in (event inserts), and 4 × 6 in for large badges. Each comes in a vertical or horizontal version, with the slot on the short or long edge. Order the same orientation you designed.
- Lanyards are about 36 in long end to end, which hangs a badge roughly 18 in below the back of the neck, at mid-chest. Common widths are 3/8, 1/2, 5/8, 3/4 and 1 in. 5/8 or 3/4 in is the usual choice for a printed logo; 1 in suits sponsor lanyards.
- Breakaway clasps pop open when the cord is pulled hard. Schools, hospitals and work floors often require them.
Making one badge per attendee from a spreadsheet
Typing 300 names into a name tag template is where mistakes come from: a misspelled name, a speaker printed as an attendee, a duplicated check-in code.
Your registration export is already the data. In bannx you design one badge and mark the parts that change as variables: first, last, company, role, checkinId. Add a QR code layer (Insert → QR code) and bind its value to {{ checkinId }}, so every badge prints its own code. If your scanner reads barcodes instead, a barcode layer does the same with Code 128, Code 39 and other formats. Both print as crisp vectors in the PDF, and a value the format can't encode shows the reason in the editor instead of a blank.
Export the attendee list as a CSV with a header row that matches the variable names:
id,first,last,company,role,checkinId,_variation
okafor-amara,Amara,Okafor,Northfield Labs,Head of Data,DS26-00417,Speaker
becker-tom,Tom,Becker,Riverline,Product Manager,DS26-00418,
lopez-ana,Ana,López,Bramble & Co,Founder,DS26-00419,Sponsor
- The
idcolumn names each file. - The optional
_variationcolumn picks a saved variation of the template for that row. Save "Speaker" and "Sponsor" variations with a different color band, and one template covers every attendee type. A blank cell keeps the default look. - Sort the sheet by last name before you render, so the printed stack matches the pickup table.
Open the template's Bulk tab, set Rows from to CSV file and choose the file. Every line becomes a row you can hover to preview on the badge, which is the moment to catch a name that doesn't fit.
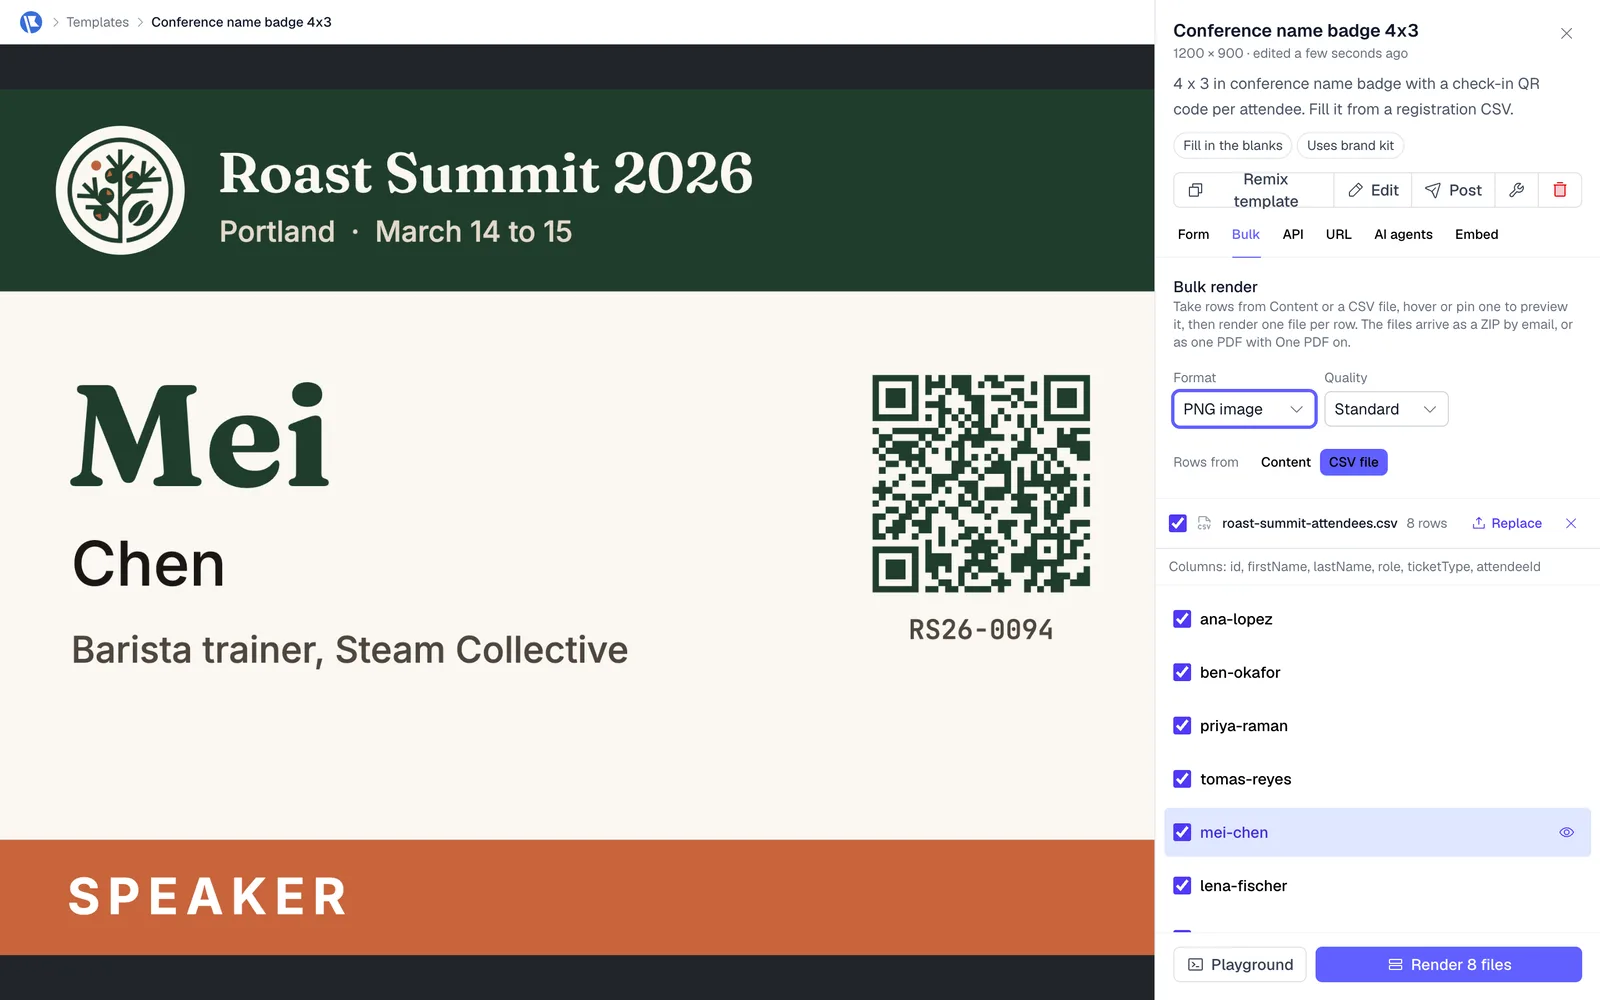
Choose PDF and render. You get a ZIP with one PDF per attendee, or turn on One PDF to merge every badge into a single file in row order. A template with two scenes (front and back) gives two pages per badge. Set the template's PDF size to 300 dpi (Template settings → Output → PDF size) and a 1200 × 900 px design comes out as a 4 × 3 in page.
For late registrations, the bulk API takes the same rows, up to 500 per request, and the Render API makes one badge at a time; see "Codes per render" and "Bulk rendering" in the rendering docs. A PDF costs 1 credit per page, and every account gets 100 free renders a month. Bulk runs (the Bulk tab and the bulk API) are on paid plans. The spreadsheet guide explains the column rules in more detail.
Printing several badges on one sheet
bannx doesn't lay out several badges on one sheet for you: there's no "6 per page" setting. One page is one badge. You have three ways to get them onto sheets:
- Use your printer's pages-per-sheet option. Open the merged PDF and choose 4 or 6 pages per sheet in the print dialog, then cut on plain card stock. Print drivers add their own margins and scaling, so this won't line up with pre-perforated label sheets.
- Design the sheet as one page. For pre-cut stock, make the template a full US Letter page and lay the badge cells out at the positions in the label maker's template for your product number: a wrap auto-layout frame with gaps that match the sheet, and one badge cell inside it set to Repeat over a list variable such as
badgeswith six sample items. Each render is then one sheet. In a CSV, dotted headers fill list items (badges.0.first,badges.1.first, and so on), so one row is one sheet of six. It works, but print one test sheet on plain paper and hold it against the label sheet first. - Print one at a time on a label printer. If you print at the door as people arrive, a 4 × 3 in thermal label printer takes the single-badge PDFs as they are, and you only print for people who came.
Start from a template
bannx templates are free to edit and download as PNG or PDF, with no account and no watermark. Start from the 4 × 3 in name badge template: it has the big first name, last name, company and role, a QR code for check-in, and a colored band that changes with the attendee type (speaker, staff, sponsor or attendee). Its CSV columns are firstName, lastName, company, role, attendeeType and attendeeId (the QR value), so rename the headers of the sheet above to match; attendeeType sets the band, so that template needs no _variation column. For the posts that promote the event, see the event templates, such as the speaker quote post. Keep the event's logo, colors and fonts in the brand library, so badges, posts and signs match.
Handing out certificates after the event too? The certificate templates guide has the wording, and certificates in bulk runs the same attendee sheet through a certificate. For signs and posters at the venue, see poster sizes, and for numbered vouchers, the gift certificate template guide.
FAQ
What size is a standard name badge? The standard conference badge is 4 × 3 inches, printed six to a letter sheet and worn in a clear holder. Smaller inserts are 3.5 × 2.25 inches, eight to a sheet, and adhesive name tags are 2⅓ × 3⅜ inches, also eight to a sheet.
What size is a CR80 badge? 85.60 × 53.98 mm, given as 3.370 × 2.125 inches in ISO/IEC 7810, where it's called ID-1. It's the size of a credit card. Holder makers often write it as 3.375 × 2.125 inches.
How do I design a name tag? Make the first name the largest text, with last name, company and role smaller underneath. Add the event logo, a color band for the attendee type and a QR code if you check people in. Test the layout with the longest name on your list.
How can I make printable name tags for free? Start from a free template, type the names, and print on badge inserts or adhesive sheets. For a long list, use a tool that turns each spreadsheet row into one badge instead of typing names one at a time.
How long is a lanyard? About 36 inches end to end, which hangs a badge around 18 inches below the back of the neck. Common widths run from 3/8 to 1 inch, with 5/8 and 3/4 inch the usual choice for printed logos.